Sunday, October 31, 2010

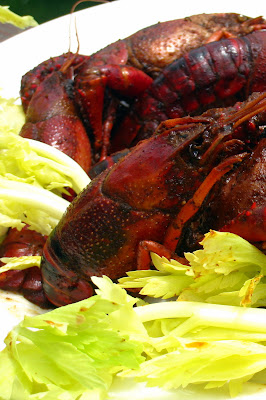
Boiled Crawfish


Crawfish boils are usually held outdoors as it will be messy and lining the table with newspaper, makes cleaning up so much easier. It is usually cooked in a large scale (a whole truck-load of crawfish), but with this scaled-down recipe, you can make it in the kitchen. Some of the fun of boiling crawfish is personalizing your boil by adding favorites accompaniments such as artichokes, mushrooms, sausage, even broccoli besides the regular potatoes and corns.


Ingredients:

12 pounds live crawfish
8 quarts water
1 package (1 pound) Zatarain's® Crawfish, Shrimp & Crab Boil
1 large onion, peeled
1 head garlic, halved crosswise
1 1/2 pounds small red potatoes
6 ears corn, shucked and halved crosswise
2 - 3 oranges/lemons - cut into wedges

Method:
Pour live crawfish into a washtub or ice chest; cover with water. Drain. Repeat 3 to 4 times until crawfish are clean. Drain. Discard any dead crawfish and debris.

Mix 8 quarts water, Crab Boil, onion ,garlic and oranges/lemons in large (20-quart) stockpot. Bring to boil on high heat; boil 5 minutes.
Add potatoes; boil 5 minutes. Add crawfish and corn; return to boil. Cover and cook 2 minutes.

Turn off heat and let stand 20 minutes.
Add about 6 to 8 cups ice to stockpot; let stand 20 minutes to cool.
Drain and serve.


Serves

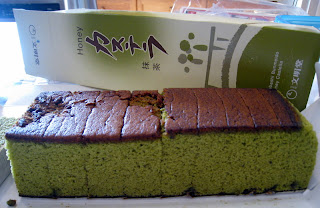
Green Tea Kasutera/Castella Cake


Ingredients:

4 large eggs
2 yolks
4 1/2 tbsp fine granulated sugar
3/4 cup bread flour,
1 tbsp fine granulated sugar,
1 tbsp green tea powder
1/8 tsp salt
2 tbsp honey
2 tbsp milk
2 tbsp oil
Sugar for sprinkling
Glaze:
1 tbsp honey
1 tbsp hot water

Method:
Line a cardboard box with heavy duty aluminium foil and grease the inside, then line with grease proof/parchment paper, bottom and sides - make the sides 1 1/2 inches higher than the sides. Sprinkle sugar on to the base of box.
Arrange oven rack to the middle of oven and preheat oven @ 350f.
Sieve flour, green tea powder, salt and sugar together.
In a saucepan, one which your mixer bowl will sit and the bottom does not touch the water, heat about 1 inch of water to 110f.
Rince mixer howl with tap water as hot as possible to warm, then dry well.
Whisk eggs, egg yolks and sugar in the warm bowl sitting over the simmering water.
Check the temperature of the mixture, you want to get the mixture between 86 - 90f. Keep whisking and checking the temperature.
Put honey and milk in a bowl and place it over the warm water, stir to melt the honey. Remove and leave aside.
Place the bowl of warm egg mixture on the mixer with the whisk attachment. Beat on high speed for 2 minutes only. Turn the speed down to medium(4 in kitchenaid) or just below medium and beat for 10 minutes until the foam is completely cool, thick and shiny.
Sift part of the flour mixture on top, avoiding the edges of the bowl and 1 tbsp of honey and milk mixture. Very carefully fold once only by dipping a large spatula into the foam at the 12 o'clock position, dragging it across the bottom. At the 6 o'clock position, lift up some foam and spread it across the top. Sift more of the flour mixture and honey mixture, fold again. Try to incorporate all the flour and honey mixture in about three to five batches and fold carefully to blend.
Place oil in a medium mixing bowl and spoon in 1 cup of the batter and fold together. When this is well blended, fold this mixture into the main batter.
Pour the batter into the prepared pan.
Bake in preheated oven for 10 minutes and then reduce heat to 300f and bake further for 40 minutes. Check for doneness.
As soon as the cake is out of the oven, brush the top with the honey-water mixture.
When it's cool enough to handle but still warm, lift it out of the pan, paper and all, and put into a plastic bag. Seal the bag and put into the refrigerator, for several hours preferably overnight as this will ensure a moist texture.
To serve, use a very sharp serrated knife to make clean cuts. Cut off the sides and make small, neat slices.
Enjoy

Serves

Wan Pin Kou


It snowed so badly yesterday and today and i am snowed in. I made this as the whiteness of this snack sort of resembled the snow. This is a very traditional snack of yesteryears. It used to be in a rectangular cut shaped snack packed in pink paper and i wonder if it is still so. There is no flavorings or colorings whatsoever, just sweet and white, that is why it is packed in pink paper cos chinese associates white with death. I think this snack looks more appealing with patterns and a filling to enhance the taste. It is easy and fun to make but has to be consumed when freshly made as it will get hardened fast in high altitude, even in air-tight containers, perhaps it is better at sea-level places.


Ingredients:
Cookie:
100 gm. Koh fun (cooked glutinous rice flour)
80 gm. icing sugar
20 gm. Crisco shortening
1/4 tsp. Vanillin powder
30 - 40 gm. cold water
Filling:
Hawflakes/Chopped roasted peanuts/Pineapple Jam
Method:

Mix all the ingredients for the cookie together - it should look like breadcrumbs, add more water if you have to.
Fill mould with some koh fun mixture, place some filling on top then fill mould with more koh fun mixture
Press hard to have a very vivid pattern, remove excess if there is any and knock it to remove.
This cookie/snack is ready for serving.
Enjoy

Serves

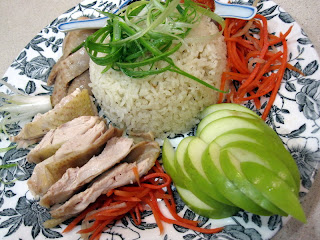
Hainanese Chicken Rice


This hainanese chicken rice meal was eaten awhile ago and everytime i sat to write about it, my mind was blank and finger's frozen, fingers are on the keyboard but they were not moving. It could be the cold that froze the fingers and i think the mind too. The fingers must have been saying - come on, i am ready but no text???????. Hope i am thinking better this morning.


Oh, i am supposed to write about Hainanese Chicken Rice - should i write about Hainanese, i think not cos this is a food blog and i am sure all would want to know about the chicken or the rice. What so special about having a chicken meal nowadays, it is served practically daily but not so when i was growing up. We only have chicken during festivals and a whole chicken would have to shared amongst our family of 3 adults and 7 children and festivals only come around 2 - 3 months apart. The day of the festival, in the early morning, my mom would go to the wet market to get the chicken. The chickens then were still very much alive and were housed in large bamboo baskets. Mom had a friend, his name is Ah Kau(cantonese for dog or the number nine - we finally found out that he was the ninth in his family)who owned the chicken stall, as soon my mom arrived, he would look into the baskets, looking for the fattest and most beautiful hen - no cockerel/rooster for the festivals. He would reach for one and the first thing Uncle Ah Kau did was to feel the breast and commented that this was fat and meaty. The next thing he would brush the feathers at the butt apart and showed to mom, i don't know what they were looking at but she nodded and seemed to agree with him. I have now found out what they were looking at, the butt of course. They were looking to see if the hen laid eggs before and that will show that it is too matured and the meat will not be as tender if it were to be prepared the one and only way/recipe - white steamed/poached. We might not be given the priviledge of looking at the butt now in the supermarket but make sure that the chicken is 4 lbs/2 kg, then you can be assured of producing a very velvety, meaty chicken for Hainanese Chicken Rice.


This chicken rice meal we had for dinner was sponsored by my dear friend Ting Ting, who have a chicken coop enough to house more than 20 chickens. She had reared them from chicks and now there are pullets, hens and roosters. It is the roosters that get to be our dinners cos Ting Ting does not want to have anymore unpleasant complaints from her neighbor, she told her sons Hunter and August to observe the roosters and as soon as they start to crow, the rooster will be Ting Ting's dinner or her friends.


Below is good read and good to know:

Chick: A hatchling


Capon: A castrated male used for meat. (How much could that yield?) Yeem Kai

Pullet: A female chicken under one year old.

Hen: A female chicken over one year of age

Rooster: A male chicken over one year of age


I will not write about the rice now of which the preparation is also very important cos i am into something which i promise you will be a good thing. Look for the good thing in my coming posts, pray that i don't get writer's block.

Ingredients:

Chicken - more than 4 lbs (if you are lucky, Ting Ting's rooster will crow)
Jasmine Rice
Sides - cucumber and tomatoes
Sauces - chopped garlic, special homemade chilly sauce, oyster sauce with fragrant oil or black sauce.


Serves
Saturday, October 30, 2010

Raspberry Danish Spirals


As the title denotes, these Spirals are made from the Danish dough. It is to be noted that it is important to make a full recipe of danish dough or the sufficient layering will not be achieved, although you only need half of the dough. An 'oven proof' jam containing a gelling agent that will not not melt out during baking is preferable. Look out for the 'gelling agent' under the 'ingredients' label from the jam bottle


Ingredients:

One half of the
recipe of The Danish Dough

3 1/2 ozs/1/2 cup/100 g granulated sugar
1 tsp/1.3 g ground cinnamon
3 1/2 ozs/1/2 cup/100 g chopped walnuts
1 large egg lightly beaten to be used as glue
12 ozs/3/4 cup/340 g seedless raspberry jam

Method:

Roll out the dough on a lightly floured surface into a rectangle 1/2 inch (6 mm) thick. Using a pizza cutter, trim the edges of the dough so they are straight.

In a separate bowl, mix the sugar, cinnamon, and walnuts together.

Using a pastry brush, lightly brush the dough with the beaten egg and evenly sprinkle the sugar, cinnamon and nut mixture over half of the dough, Using hands, spread the mixture evenly.

Fold the unfilled half of the dough over the sugar, cinnamon, and nut mixture and, using a rolling pin, lightly roll over the dough so both sides adhere.

Using a pizza cutter. cut the dough crosswise into 1/2 inch(1.25 cm) thick strips.

Working with each strip separately, gently pull a strip lengthwise to stretch it slightly and twist it over and over until it is tightly wound. Coil the twisted dough around itself to form a spiral and place the coil on a parchment-lined sheet pan.

Repeat with the remaining strips.

Allow the spirals to proof in a proof box at no higher than 85f(30c) for approximately 30 minutes to 1 hour or until they appear puffy. (i do not have a proof box, so i cover loosely, the sheet pan with plastic wrap and then cover with a damp cloth).
\
Make an indentation in the center of each coil and fill with some jam.

Preheat the oven to 400f(205c).

Bake the spirals for 10 - 12 minutes, or until they are golden brown.

While the spirals are still hot, drizzle each with the sugar icing. Sorry - no sugar icing for Lily and family.


This Croissant is made from Danish Dough and is cut differently fr
om "The Croissants i made with Croissant Dough. The base is 2 1/2 inch and the height is 10 inches.
Serves

Wednesday, October 27, 2010

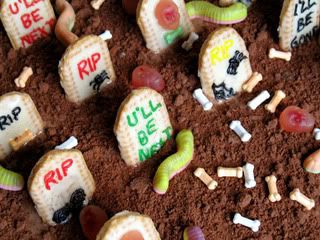
Halloween Graveyard Cake Recipes

Halloween Graveyard Cake Halloween Graveyard Cake Ingredients:

From Driscoll’s
Halloween Graveyard Cake Recipes
¾ cup water
1 package (18.25 ounce) devil’s food cake mix
1/3 cup oil
3 large eggs

Raspberry strawberry filling:

6 ounces raspberries
1 ½ cups coarsely chopped strawberries, divided
1/3 cup sugar
2 tablespoons cornstarch

Chocolate ganache whipped frosting:
2 cups heavy cream
12 ounces bittersweet chocolate, finely chopped

Garnish:
6 ounces blueberries
6 ounces raspberries
Decorated Milano cookies

Strawberries dipped in icing to make “ghosts”

Halloween Graveyard Cake Recipes
Direction:

Heat oven to 350 degrees. Lightly grease and flour two (9-inch) square baking pans. Combine in food processor 1 cup blueberries and water. Puree 1 minute or until smooth

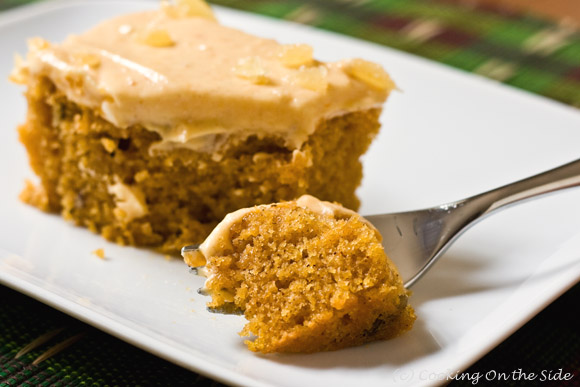
Halloween Pumpkin Spice Cake

Halloween Pumpkin Spice CakeHalloween Pumpkin Spice CakeIngredient:

2 cup all-purpose flour
2 cups sugar
1 tablespoon cinnamon, ground
2 teaspoon baking powder
1 teaspoon baking soda
1 teaspoon salt
1/2 teaspoon nutmeg, ground
1/2 teaspoon cloves, ground
1 15 oz. cans pumpkin, solid-pack, canned
4 large eggs
3/4 cup vegetable oil
1 cup raisins
6 ounce cream cheese, at room temperature
1 cup powdered sugar
1/3 cup butter, at room temperature


Direction/Methode:

Preheat the oven to 350. Grease a 15-112 x 10-112 x 1 inch baking sheet. Stir in flour, sugar, baking soda and powder, salt, and spices. Add pumpkin, eggs and oil and beat until blended. Stop the mixer and fold in the raisins.

Spread the batter in the prepared baking pan and bake about 25 minutes or until a toothpick inserted in the center comes out clean. Cool on a rack.

Beat cream cheese, powdered sugar and butter in a medium bowl to blend. Use a drop or two of both yellow and red food coloring to tint the icing orange. Spread the frosting over the cake in a thin layer and refrigerate to help set. Cut cake into bars and serve.
Halloween Pumpkin Spice Cake

Almond Danish Braid


Ingredients:

Danish Dough:

4 fl ozs/1/2 cup/120 ml lukewarm water (110f/43c)
4 fl ozs/1.2 cup/120 ml whole milk scaled and cooled to lukewarm(110f/43c) in a small saucepan
1/2 oz/3 1/2 tsp/10.5 g instant yeast
10 ozs/2 cups/285 g bread flour, plus more if needed
9 ozs/2 cups/255 g all-purpose flour
3 1/2 ozs/1/2 cup/100 g granulated sugar
1/4 oz/1 tsp/6 g salt
1/4 tsp/1.5 g ground cardamom
1/2 oz/1 tbsp/15 g unsalted butter,softened
2 large eggs, room temperature
1 lb/2 cups/455 g unsalted butter, cold but not hard (leave at room temperature for 30 minutes to soften slightly)


Almond Danish Bread:

Using one half of the Danish Dough.

Almond filling:

5 ozs/1 1/4 cups/145 g yellow or white cake broken into pieces
4 ozs/115 g almond paste
1 oz/4 tbsp/30 g granulated sugar
2 ozs/4 tbsp/55 g butter, softened
3/4 fl oz/1 1/2 tbsp/20 ml water

Almond Danish Braid:

1 1/2 oz/1/2 cup/50 g sliced almonds, lightly toasted
1 large egg white beaten with 1 tsp(5ml) water to be used as a glue and a wash.

Confectioners Sugar Icing

4 ozs/1 cup/115 g confectioners' sugar - sifted
1 - 1/2 tsp/15 - 22.5 ml milk, plus more if needed
1 tsp/5 ml vanilla extract
Method:

Danish Dough:

Add the water to the saucepan containing the sealed milk.l Add the yeast and stir to dissolve.

In the bowl of an electric mixer using the paddle attachment, combine the flours, sugar, salt and cardamom. Blend the dry ingredients on low speed until they are well combined.

On low speed gradually add the warm yeast and milk mixture, softened butter, and eggs until a soft dough forms. Stop the machine and feel the dough. If it feels too sticky, sprinkle in a small amount of bread flour.

Remove the dough from the bowl and knead it until it feels smooth and elastic but still soft. Do not overwork the dough. Shape the dough into a rectangular disk. Wrap the dough in plastic wrap and chill it for 30 minutes.

Preparing the Butter to be enclosed.

Place the butter on a piece of plastic wrap that is at least two or three times its size o a clean, dry work surface. Cover the butter with another piece of plastic wrap the same size as the first. Using a rolling pin, hit the butter to soften it slightly and then begin to roll and push it into an even 6 x 12 inch(15 x 30 cm) rectangle. Do not over handle the butter. It should, ideally, be the same consistency as the dough. Dry it aside, do not chill.

Enclosing the butter

On a lightly floured work surface, roll the chilled dough into a 9 x 18 inch (22.5 x 45 cm) rectangle. Place the rectangle of butter across two thirds of the rectangle and fold like a letter, bring the unbuttered end up over to the middle of the butter, sealing the dough all along the edges. Fold the remaining buttered portion of the dough on top, completely sealing the butter inside. Be sure to stretch the corners of the dough to square it off, pressing it down to seal the edges together. Using a pastry brush, dust off any excess flour.

Completing One Three-fold or Letter-fold turn:

Rotate the dough 90 degrees so that when the dough is rolled out, the open ends will become the short sides of the rectangle. It will be these short sides that are folded into the center to make sure the fat stays enclosed. Roll out the dough to a 9 x 18 inch(22.5 x 45cm) rectangle. Using a pastry brush, dust off any excess flour.

Take one short end of the dough and fold it one third of the way toward the middle, like a letter, pressing it down slightly. Take the other short end and pull it over the dough to meet the other side as if you are folding a letter. Press the dough down slightly so the edges remain sealed. This step completes one letter-fold turn. Press one finger into the dough to show one turn is complete. Wrap the dough in plastic wrap and chill for 1 hour. A marker can also be used on the plastic to mark one completed turn.

Repeat rolling, folding, chilling and marking the number of completed turns two more times for a total of three turns. After the third and final turn is complete, wrap the dough tightly in plastic wrap two times and chill it overnight in the refrigerator. The dough will expand in the refrigerator because of the yeast, so be sure it is swaddled securely within the plastic.

To make the Almond Filling:

In a food processor, process cake pieces until finely ground.

Add the almond paste, sugar, and butter and process the mixture until well combined. With the motor running, add the water and process the mixture until a paste forms.

To assemble the Almond Danish Braid:

Roll the danish dough out to a 10 x 15 inch(25 x 37.5 cm) rectangle on a lightly floured surface. Brush off the excess flour from the dough. Pick up the dough and place it onto a parchment lined sheet pan.

With a pizza cutter, lightly mark a line parallel to the long side approximately 3 inches in from the edge, going completely down the length of the dough without cutting through to the other side. Do the same on the opposite long side.

Spread the almond filling over the narrow rectangle that has formed. Scatter half the almonds over the filling. Using a pizza cutter, make 3 inch(7.5 cm) long cuts on an angle that are approximately 3/4 inch(2 cm) apart all the way down the length of the dough on both sides. These cuts should resemble fringe on both sides of the dough.

Lightly egg wash the fringed strips. Begin at the end of the dough where you started to cut the fringed pieces and fold the piece of the dough on top of the narrow rectangle to come over the filling by 1 inch(2.5 cm). Fold in the strips alternating left and right sides and continuing down the full length of the dough so that it resembles a braid. Reserve the egg wash by covering it with plastic wrap and place it in the refrigerator.

Place the braid in a proof box at no higher than 85f(29c) for 30 minutes to 1 hour or until the braid appears puffy.

Preheat the oven to 375f(190c)

Using a pastry brush, brush the entire surface of the braid with the reserved egg wash.

Bake the braid for 25 - 30 minutes or until the braid is golden brown.


Serves

Tuesday, October 26, 2010

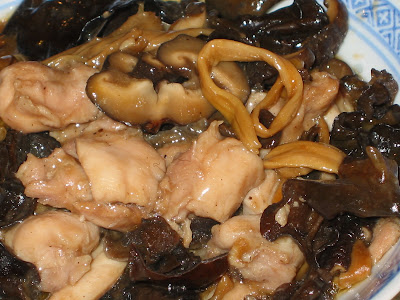
Country-Style Steamed Chicken

Country-Style Steamed ChickenIngredients:
2 chicken legs - chopped into bite-size
3 - 4 dried shitake mushrooms - wash, soak and cut into slices
1/2 cup dried cloud ear - wash, soak and drain
1/2 cup dried lily buds - wash, soak and tie into a knot
1 tbsp fragrant oil - shallots or garlic
Marinate:
2 tbsp soya sauce
1 tbsp shaoxing/hua tiau wine
1 tsp ginger juice
1 tbsp oyster sauce
1 tbsp tapioca starch/cornstarch
1/2 tsp sugar
1/2 tsp pepper
1 tsp sesame oil

Method:

Marinate the chopped chicken pieces with the marinate for 20 - 30 minutes in a deep dish that can fit into the rice cooker.

Mix the sliced mushrooms, cloud ear and lily buds into the marinated chicken and drizzle with fragrant oil.

Place the dish of chicken on top of rice in rice cooker, when big bubbles are no more visible on the rice surface. Close lid tight. The chicken will be cooked when the rice is ready for serving.

Serves

Sunday, October 24, 2010

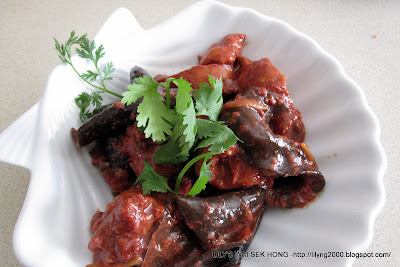
Chicken With Red Wine Residue


Ingredients:

2 lbs chicken - cut into bite size
1 - 2 ozs wood ear fungus - soak, woody parts removed and cut into bite size
3 heaped tbsp red wine residue(refer to Homebrewing - Glutinous Rice Wine
2 shallots - chopped
2 cloves garlic - chopped
1 tbsp chopped ginger
1 tbsp soya sauce
1/2 cup chicken stock
2 tbsp oil
Pepper and salt to taste
Sesame oil
Coriander or Spring onions as garnishings


Method:

Sprinkle salt and pepper to the chicken pieces.

Heat wok and add in 1/2 tbsp oil, just enough to coat the wok. Brown the chicken pieces by batches, do not crowd the wok. Remove and set aside.

Add in the rest of the oil and saute the chopped shallots, garlic and ginger until fragrant.

Add in the red wine residue and continue to saute until aromatic.

Add in the browned chicken pieces, wood ear fungus and chicken stock. Bring to the boil, add in the soya sauce and reduce heat to simmer. Cover the wok and simmer until the chicken pieces are cooked through.

Remove wok cover and cook down the sauce.

Adjust taste with salt and pepper.

Sprinkle with sesame oil and garnish with coriander and/or spring onions.

Enjoy


Serves

Thursday, October 21, 2010

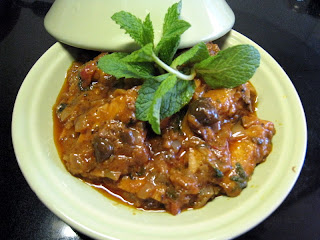
Chicken With Salted Lemon and Olives

Chicken With Salted Lemon and Olives


Ingredients:

Marinade:

4 cloves of garlic, minced
1/4 tsp freshly ground black pepper
1 tbsp oil

4 chicken thighs cut into serving sized pieces
Spices:

A pinch of saffron
1 tsp ground cumin (optional)
1/2 tsp ground turmeric (optional)
1 tsp ground coriander (optional)
one stick of cinnamon (optional)

Oil for pan-frying chicken
1 big onion, finely chopped
1 tsp grated ginger
1 cup unsalted chicken broth or stock (or water)
1/2 cup olives
1 preserved lemon, cut into slices or chopped
salt, to taste

Method:

Mix the garlic, black pepper, and a spoonful of oil. Rub the chicken with the mixture and set aside for a few hours or overnight.

Heat the oil in a tagine or skillet. Fry the chicken until all sides begin to brown. Remove and set aside.
Add onions, ginger and spices.. Stir-fry over high heat until fragrant.

Put browned chicken back to cook and add chicken broth/stock, or water.
Bring to a boil and reduce heat.
Cover, but leave a crack for steam to escape. (if using the large tagine, there should be a steam outlet).
Simmer over low heat until chicken is tender and cooked through.

Add olives and preserved lemons and taste first before adjusting taste with salt.
Continue to simmer until sauce has thickened.
Serve chicken, covered with sauce...
Chicken With Salted Lemon and Olives

Ginger And Garlic Sauce


Ginger And Garlic Sauce

Ginger And Garlic Sauce

Ginger And Garlic Sauce Ingredients:


1 1/2 cups Rendered Chicken Fat
4 ozs/113 g ginger - peeled
5 ozs/150 gm garlic - peeled
6 tsp salt
6 tsp Knorrs Chicken Broth Mix/chicken granules/cubes

Method:

Using the food processor, process the ginger and garlic into a paste.

Pour into a large bowl which is microwave-safe, add in the rendered chicken fat and microwave on high for 3 minutes, one minute at a time and stir.

Add in salt and Knorrs Chicken Broth Mix.

Cool before bottling and keep in the fridge.


Ginger And Garlic Sauce
Serves
Related Posts with Thumbnails